2014#15: The lip print top – O top estampado de beijos


ETA: Click here to see me wearing the top!

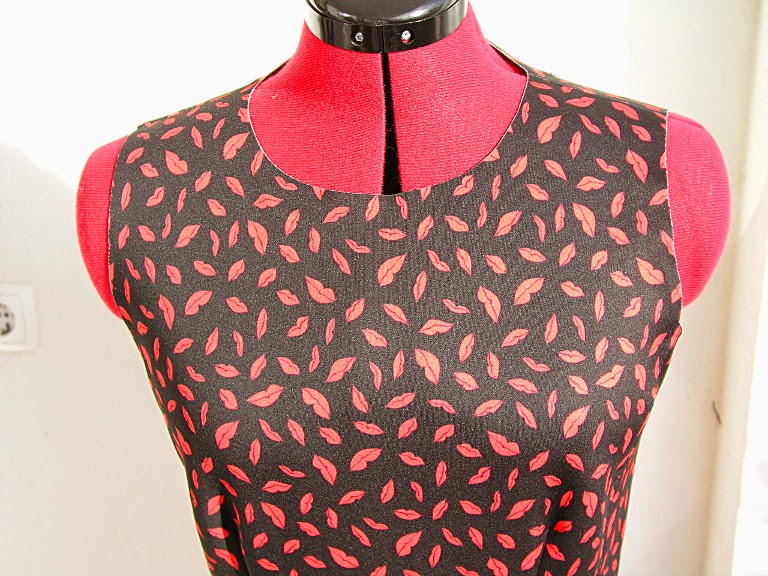
I've made this top out of the remnant fabric from the lip print dress, using the same pattern for the bodice but altering the neckline to a V-line instead. The peplum was made shortening the upper skirt panels of the dress. As you can see, there’s no back zipper this time: 
--- 

Editado para acrescentar: Podem ver-me a usar o top clicando aqui

Fiz este top com o tecido que sobrou do vestido estampado de beijos, usando o mesmo molde para o corpo mas alterando o decote. O folho da bainha também foi feito encurtando os panos superiores da saia do vestido. Como podem ver, não precisei de coser um fecho atrás:


The next photo shows the rather unusual armhole shaping of both the dress and the top: 
--- 
Na próxima foto podem ver o detalhe da forma da cava, um detalhe for a do vulgar no vestido e agora no top:

And this sums up my sewing projects during the past vacation week! Hope you all have enjoyed it! Hugs to all!
---
E assim termino de mostrar o que costurei durante esta semana de férias, espero que tenham gostado! Um abraço!

2014#14: The lip print dress – O vestido estampado de beijos


I've made this dress for my birthday party (I turned 43 on the 24th of April and we celebrated with our close family on the 25th). You can see pictures of me wearing the dress on my wardrobe blog (click here). Again I used neoprene fabric which made the construction faster than usual because the armholes, neckline and hem could be left raw. It took about four hours to get the dress completed and I think it turned out quite well. The pattern is a designer pattern from the Milanese duo Aquilano & Rimondi published in the BurdaStyle 2014/01, model 124. I’ve made a few modifications, skipping the raised neckband and changing the zipper placement to the back. When the dress was finished I realized there was no need for the zipper at all because the neoprene stretches just enough to get the dress on without the back closure. Since I planned to leave the neckline, armholes and hem raw, I didn’t add SAs there. There was some fabric left so I was able to make a top out of it as well (to be reviewed next). Enjoy the pictures and thank you so much for visiting! 
--- 
Fiz este vestido para usar na minha festa de anos (fiz 43 anos no dia 24 de Abril, mas só celebrei no dia 25). Podem ver fotos do look completo no meu blogue de estilo pessoal (clicar aqui). Mais uma vez usei tecido tipo neopreno, o que fez com que a construção do vestido fosse mais rápida, pois o decote, as cavas e a bainha puderam ser deixados “a fio”. Demorei cerca de 4 horas a fazer o vestido e acho que ficou bastante bem. O molde é de um modelo de designer, do duo Milanês Aquilano & Rimondi, publicado na BurdaStyle 2014/01, modelo 124. Fiz algumas modificações: não incluí a gola subida e passei o fecho da costura lateral para a costura de trás. Depois do vestido terminado apercebi-me que o fecho foi desnecessário, uma vez que consigo vestir o vestido sema abrir o fecho. Como queria deixar o decote, cavas e bainha a fio, não adicionei estes valores de costura ao molde. Ainda me sobrou um bocado de neopreno, bastante para um top que mostrarei a seguir! Vejam as imagens e obrigada por visitarem!


2014#13 – The Forest Dress – O vestido “Floresta”


When I saw this neoprene fabric I knew I had to make a dress out of it! The landscape print repeats every 90cm (approx. 35”) so this had to be a short tube dress. I copied the pattern directly from a RTW stable knit dress. This has to be the fastest dress I ever made: it took 40 minutes to complete, including copying the pattern from the original dress to paper. The neoprene knit doesn't need finishing so I left the neckline and armhole edges raw, only stitched a narrow hem. Enjoy the pictures; they will do all the talking for me! 
 
--- 
 
Quando vi esta malha tipo neopreno, sabia que tinha de fazer um vestido com ela! O padrão da paisagem repete-se cada 90cm, por isso teria sempre de ser um vestido curto e para tirar partido do padrão, deveria ser o mais simples possível. Resolvi copiar o molde diretamente de um vestido de malha que comprei e creio que bati o meu record da peça mais rápida de fazer de sempre: demorei apenas 40 minutos a fazer o vestido, incluindo o tempo de copiar o molde para papel! Como este tecido não desfia nem desmancha, as orlas do decote e cavas foram deixadas “a fio”, apenas fiz uma bainha estreita para melhorar o caimento do vestido. Vejam as fotos, elas falarão por si próprias!


2014#12 – Sky blue wide pants – Calças largas azul-céu


I've made these pants using the same modified pants pattern that I used for my navy&black set pants (BurdaStyle 2013/12 model 103), only this time I used a woven stretch fabric instead of stable knit. You can see me wearing the sky blue pants at my personal style blog (click here). 
 
--- 
 
Fiz estas calças usando o mesmo molde modificado das calças do meu conjunto marinho e preto (BurdaStyle 2013/12, modelo 103), só que desta vez usei sarja elástica em vez de malha estável. Podem ver-me a usar as calças azul-céu no meu blogue de estilo pessoal (clicar aqui).


Conclusion: This pattern is a winner! Using a different fabric gives it a completely different effect and I also love this version very much! I feel like using this pattern a few more times, perhaps altering a detail here and there,… I could see this pattern used to make some culottes and/or with lace on the side panels; the possibilities are endless when you find a pattern that suits your taste and style and fits perfectly like this one!
 
---
 
Conclusão: Este molde é sem dúvida um must! O facto de usar um tecido diferente dá-lhe outro ar, mas adoro igualmente esta versão, e creio que não me vou ficar por aqui… Consigo imaginar este modelo numas “coulottes” (calças largas curtas) e/ou com painéis laterais em bordado inglês, por exemplo,… Quando se encontra um molde que nos agrada na forma, no estilo e que assenta bem, as possibilidades para o aproveitar são imensas!

2014#11: The owl sheer top – Top de tecido leve estampado com corujas


ETA: You can pictures of me wearing the top on my personal style blog (click here)

This is the first of my short vacation at home sewing projects; I had this cute owl print sheer fabric in my stash and since baby blue is so trendy for this spring I decided to make a top out of it; this top has an accentuated V shaped neckline, wide sleeves and in spite of the recommended fabrics being fabrics with some body like linen or satin, I thought it would perfect for a sheer fabric like chiffon or gauze as well. The pattern used was BurdaStyle 2014/02 model 117
--- 
Editado para acrescentar: Podem ver fotos minhas a usar o top no meu blogue de estilo pessoal (clicar aqui)

Este é o primeiro dos projetos concluídos durante a minha semana de férias em casa; tinha este tecido estampado com corujas que acho bastante engraçado e como o azul-bebé está bastante na moda para esta primavera, decidi fazer um top com ele. O top tem um decote em V bastante acentuado e mangas abalonadas, e apesar dos tecidos recomendados serem tecidos com algum corpo (como o linho e o cetim), achei que também ficaria bem com um tecido mais leve e fino como este. O molde usado foi o modelo 117 da BurdaStyle 2014/02:

I’m not going to extend this review because I have a few more garments to be reviewed; I’ll just say that this type of fabric is not easy to cut (I layered it on top of newspaper papers and used a rotary cutter and mat), it’s also not heat resistant, so I had to use the pressing iron on the lower setting and always use a press cloth between the iron and the fabric,…) Applying fusible interfacing to the neckline facing was an adventure on its own and after a few tests I found a low temperature sheer fusible interfacing that worked . The seam treatment was the simplest possible, after stitching (used the thinnest needle available on the sewing machine, size 60) I zigzagged SAs together and trimmed away the excess. 
--- 
Não me vou estender muito no processo de costura pois tenho mais algumas peças para mostrar; vou apenas mencionar que um tecido deste tipo não é fácil de cortar pois é muito escorregadio; estendê-lo sobre folhas de jornal ajuda a mantê-lo direito enquanto se corta e uma lâmina rotativa com tapete de corte próprio é sem dúvida o método de corte que resulta melhor. O tecido também não aguenta temperaturas altas, tive de o passar com o ferro no mínimo e mesmo assim usar sempre um pano fino entre o tecido e o ferro. Aplicar entretela termo-colante à vista do decote foi um filme: depois de várias tentativas lá consegui usar uma entretela muito fina que colava a baixas temperaturas. O acabamento das costuras também foi o mais simples possível: depois de cosidas (usei a agulha mais fina na máquina, tamanho 60), chuleei os valores de costura juntos com ponto ziguezague e aparei rente ao ziguezague.


Conclusion: A nice trendy top that I’ll layering over a strappy top! Loved the end result! Stay tuned for quite a few more garments to be reviewed next!
---
Conclusão: Um top bem na moda para usar sobre um top de alcinhas! Adorei o resultado! Fiquem atentos pois tenho mais algumas peças feitas para mostrar!

2014#9 – Navy&black set: the pants – Conjunto marinho&preto: as calças


Description: Low waist wide pants with side panels, front-fly zipper, shaped waistline and in-seam pockets. 

Pattern used: BurdaStyle 2013/12, model 103B with modifications (click here for more details) 
--- 
Descrição: Calças largas de cintura descida, paineis laterais, carcela com fecho na frente, cós enformado e bolsos metidos na costura. 

Molde usado: BurdaStyle 2013/12, modelo 103B com modificações (clicar aqui para os detalhes).

Fabric used: thin stable knit in navy blue and black, with some Lycra in the composition. 
--- 

Tecidos: Malha estável fina em azul-marinho e preto (tem alguma lycra na composição) 

Front-fly zipper / Carcela com fecho:


The pockets / Os bolsos:


The back crotch reinforcement using lining selvage: 
--- 
O reforço do gancho usando aurela de forro:

Conclusion: I LOVE these pants, seriously (see me wearing the pants here and the complete navy&black set by clicking here)! I’m already cutting another pair using this same pattern (different fabric though, I’ll be using some stretch woven fabric this time). Have fun in the weekend you all!
---
Conclusão: ADORO estas calças (podem ver-me a usá-las aqui e fotos a usar o conjunto completo estão publicadas aqui)! Já estou a cortar outras calças usando o mesmo molde, mas um tecido diferente desta vez (um tecido elástico sem ser de malha, um pouco mais encorpado). Espero que tenham gostado, divirtam-se no fim-de-semana!

2014#10 – Navy & Black set: The top – Conjunto Azul Marinho e Negro: o top


I've jumped ahead to the top, the pants review (2014#9) will be up next; 
--- 
Saltei diretamente para o top, ainda falta o artigo sobre as calças (2014#9) que será publicado a seguir.


Description: Close fitting cropped knit top with raised neckline, shaped short raglan sleeves and french darts; the original model has two invisible zippers, one on the side and another on the left shoulder. I opted for inserting an invisible zipper on the center back seam instead.
Pattern: BurdaStyle 2012/01, model 113; this pattern is for petite sizes; I transformed it into regular size (click here for the article detailing the procedure).
---
Descrição: Top justo tem gola subida, mangas raglan curtas e pinças francesas na frente, pinças verticais atrás; o original tem dois fechos invisíveis, um de lado e outro na costura do ombro esquerdo; optei por aplicar apenas um fecho invisível na costura central das costas.
Molde: BurdaStyle 2012/01, modelo 113; este molde é para senhoras pequenas, mas alterei-o para tamanho normal (clicar aqui para uma descrição sumária do procedimento)

Details&Alterations / Detalhes&Alterações
As mentioned above, I opted for an invisible zipper on the center back; I used this tutorial by sewing Diva Els for the zipper insertion and this other one also by Els to finish the zipper with the neck facing (I omitted the button and the lining loop, though).
---
Como já mencionei, optei por um fecho invisivel na costura central das costas; usei este passo-a-passo da Sewing Diva Els para aplicar o fecho e este outro da mesma autora para fazer o acabamento do fecho com a vista do decote (omiti o botão e a anilha de forro).
Front neckline and sleeve detail / Decote na frente e manga:


This pattern is for a crop top and since I plan on wearing it to the office, instead of having to layer it over another longer top I opted for adding a false layer in black, simply narrow zigzag stitching it to the previously folded hem:
---
Este molde é para um top curto (mesmo depois das alterações), mas como planeio usá-lo no escritório, em vez de depois ter de o usar sobre outro top mais comprido, optei por acrescentar uma camada falsa dando o efeito da sobreposição; basta coser com ponto ziguezague estreito à bainha previamente dobrada do top:


Conclusion: The top turned out great and pairs wonderfully with the pants (see me wearing the pants here); the pictures were taken in a hurry during the weekend, they don’t do justice to the top that looks much better on me than on the dressform. Now all I can do is hoping for warmer weather days to be able to wear it! Thank you so much for reading!
---
Conclusão: O top ficou ótimo e conjuga muito bem com as calças do conjunto (podem ver-me a usar as calças aqui); as fotos foram tiradas à pressa no fim-de-semana e não fazem justiça a esta peça… Garanto-vos que fica muito melhor vestido em mim do que no manequim! Agora resta-me aguardar por dias mais quentes para o poder estrear! Obrigada por visitarem!